FMP
Build a Multi-Agent Stock Research Assistant Using FMP MCP and Python
Dec 29, 2025
Stock research takes time. You jump between financial statements, news feeds, ratio tables, and endless websites. Even with APIs, you still need to stitch data together before you can understand a company. That's exactly where multi-agent AI can take over the glue work.
Instead of one large model doing everything, you create a team of specialized agents. Each agent performs a clear task — fetching the company profile, reading financial statements, extracting ratios, evaluating risks, or summarizing insights. These agents work together through a shared state, giving you a structured research workflow that feels like a real equity analyst team working behind the scenes.
This article shows how to build that assistant using Financial Modeling Prep's MCP Server. FMP offers clean and reliable fundamentals, ratios, filings, and market data. MCP turns these endpoints into callable tools that LLM-based agents can use directly inside Python. You'll combine both to automate deep research on any company in seconds.
Before we write a single line of Python, let's understand how FMP MCP simplifies tool-based access to financial data.
What Is FMP's MCP Server and How It Simplifies Financial Data Access?
Financial Modeling Prep gives you everything you need to analyze a company — fundamentals, earnings, news sentiment, ratios, filings, technical indicators, ETFs, and more. Most APIs return unstructured JSON, but FMP goes a step further by offering an MCP Server that exposes these datasets as structured tools. This matters because LLM-based agents interact far more reliably with tools than with raw URLs.
MCP (Model Context Protocol) works like a bridge between your Python agents and FMP's datasets. Instead of writing long API calls, each agent simply calls a tool. For example, a profile agent can call a tool like getCompanyProfile, while a fundamentals agent can use a tool that fetches income statements or cash flow data. The MCP server handles authentication, routing, and formatting, so your agents always receive clean, organized data.
This creates a perfect environment for multi-agent systems. Each agent focuses on one type of insight, and MCP ensures every request delivers consistent information. No broken URLs, no messy payloads, no parsing overhead. Your LLM agents simply ask for what they need, process the output, and pass it along to the shared state.
If you want to see the exact tool names, parameters, and response schemas, check FMP's official MCP documentation — it lists every available tool in a clean, machine-readable format.
Once we have MCP running and wired up to Python, building the multi-agent research assistant becomes a smooth, modular workflow. Every agent becomes a plug-and-play unit that scales effortlessly as your system grows.
Next, let's look at how the complete architecture fits together.
FMP Data Sources Behind the MCP Tools
- Company Profile Data API
- Income Statement API
- Balance Sheet Statement API
- Cash Flow Statement API
- Key Metrics (TTM) API
- Stock News API
- MCP Server (GitHub) — official repository
- FMP's MCP Server - Available tools
Architecture: LLM + MCP + Multi-Agent Graph Overview
A multi-agent research assistant looks complex from the outside, but the internal structure is surprisingly clean. You combine three core components—an LLM, FMP's MCP Server, and a multi-agent graph—into a single pipeline that behaves like a team of analysts working together.
The LLM drives the reasoning. It interprets the user's query, decides which agents should run, and synthesizes all insights at the end. Instead of handling raw API calls, the LLM interacts with the MCP server, which exposes FMP's financial data as structured tools. These tools act like reliable building blocks: company profile, financial statements, ratios, earnings, news, and more.
The multi-agent graph manages the workflow. Each agent is a node with a specific responsibility. One agent fetches company details. Another reads financial statements. A third evaluates valuation ratios. A fourth performs risk checks. The final agent writes the research summary. You connect these agents using a shared state, which stores all intermediate results and prevents duplication.
When the user enters a request—like “Analyze NVIDIA for me”—the workflow begins with a routing node. The router identifies the required agents and triggers them one by one. Each agent retrieves data through FMP MCP, processes it, and updates the state. The graph continues until the summary agent produces a clear, well-structured final report.
This architecture gives you two major advantages: scalability and control. You can add new agents anytime, customize how data flows, and track the entire reasoning chain. It's transparent, modular, and perfectly aligned with modern agentic AI practices.
With this foundation in place, let's set up the project and connect to FMP's MCP Server.
Setting Up FMP MCP and the Python Project
Before we design agents, we need three things in place:
- FMP account and API key
- FMP's MCP Server running locally
- A simple Python project that talks to MCP and your LLM
Let's go step by step.
1. Prerequisites
Make sure you have:
- Python 3.10+
- Docker (or another way to run the MCP server)
- An FMP API key
- An LLM provider key (OpenAI / Groq / Gemini - we'll keep it generic for now)
Create a fresh project folder, for example:

Install the core packages:
|
pip install openai langchain langgraph python-dotenv |
2. Run the FMP MCP Server
You'll expose FMP's tools to your agents via MCP. The easiest way is usually through Docker.
A typical pattern looks like this:

Key points:
- FMP_ACCESS_TOKEN holds your FMP key.
- FMP_TOOL_SETS controls which tool groups the server exposes.
- Port 8090 (host) forwards to 8080 (container).
Once the container runs, your MCP endpoint will be something like:
|
http://localhost:8090/mcp/ |
We'll point our Python client to this URL.
3. Project Layout
Keep things modular. A simple structure:
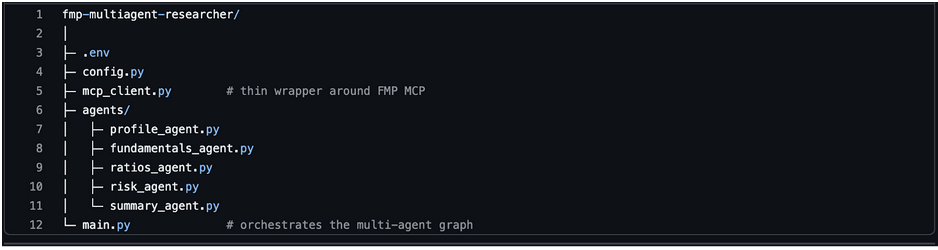
You can adjust names later, but this layout keeps agents clean and testable.
Create a .env file:
|
FMP_MCP_ENDPOINT=http://localhost:8090/mcp/ OPENAI_API_KEY=your_llm_key_here |
And a minimal config.py:
|
import os from dotenv import load_dotenv load_dotenv() FMP_MCP_ENDPOINT = os.getenv("FMP_MCP_ENDPOINT") LLM_API_KEY = os.getenv("OPENAI_API_KEY") |
4. Quick Sanity Check: Talking to FMP MCP from Python
Before we involve multiple agents, confirm that Python can call a single MCP tool.
Create mcp_client.py:
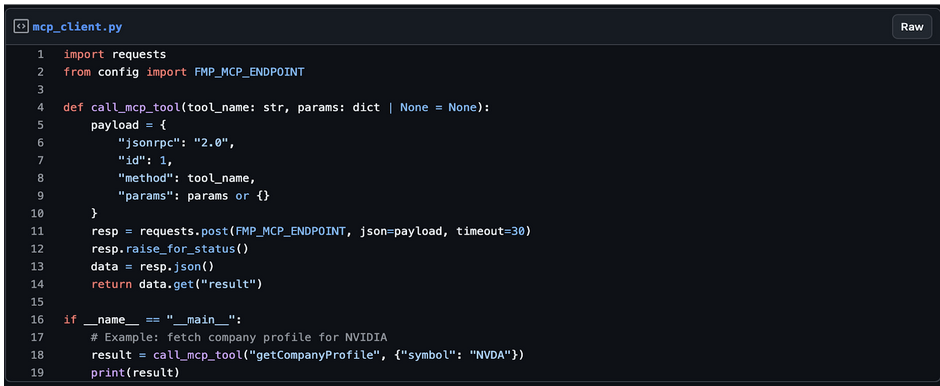
Run:
|
python mcp_client.py |
If you see structured JSON with NVIDIA's profile, your MCP setup works. We can safely build our multi-agent system on top of this.
Designing the Agent Team for Stock Research
A good multi-agent system feels like a real team. Each agent owns one responsibility and doesn't try to do everything. That clarity makes the system easier to debug, extend, and explain to readers.
For this assistant, we'll build five core agents:
- Ticker & Profile Agent
- Fundamentals Agent
- Ratios & Quality Agent
- Risk & News Agent
- Research Summary Agent
All agents share a common state. Each one updates that state instead of returning isolated results.
1. Ticker & Profile Agent
Goal: Start from a ticker (or name) and collect basic company context.
This agent will:
- Validate or resolve the ticker
- Fetch the company profile from FMP MCP
- Store fields like name, sector, industry, market cap, currency, and exchange
This agent runs first because every other agent needs a valid ticker and basic metadata.
2. Fundamentals Agent
Goal: Pull the core financial statements.
This agent will:
- Fetch the income statement, balance sheet, and cash flow statement
- Focus on recent periods (last 4-8 quarters or years)
- Extract key numbers like revenue, net income, EPS, total debt, cash, and operating cash flow
It will store both raw values and a few derived trends, like revenue growth or margin changes.
3. Ratios & Quality Agent
Goal: Translate raw numbers into intuitive metrics.
This agent will:
- Fetch financial ratios and key metrics (P/E, EV/EBITDA, ROE, ROIC, margins, leverage, payout, etc.)
- Highlight profitability, efficiency, and capital structure quality
- Mark obvious signals: “high leverage”, “strong margins”, “declining ROE”, and so on
Instead of dumping everything, it picks the most useful ratios and tags them for the summary agent.
4. Risk & News Agent
Goal: Add risk and sentiment context on top of fundamentals.
This agent will:
- Use historical price data to inspect volatility and drawdowns
- Optionally pull beta or other risk metrics if exposed in your MCP tool set
- Fetch recent news or sentiment scores for the ticker
- Tag notable events like downgrades, lawsuits, product launches, or macro shocks
The idea is simple: fundamentals tell you what the company looks like, risk and news tell you what could go wrong or right.
5. Research Summary Agent
Goal: Turn structured data into a readable research note.
This is the only agent that talks directly to the LLM in a generative way. It will:
- Read the shared state (profile, fundamentals, ratios, risk, news flags)
- Follow a fixed template (Business Overview → Financials → Quality → Risks → Final Takeaway)
- Generate a concise, analyst-style write-up in natural language
Because earlier agents have already done the heavy lifting, this agent does not need to improvise or hallucinate numbers. It simply explains what the data already contains.
How These Agents Work Together
At a high level, the flow looks like this:
- User input: “Analyze NVIDIA (NVDA) for me.”
- Router triggers Ticker & Profile Agent.
- Once a profile is stored, it triggers the Fundamentals Agent.
- After fundamentals, the Ratios & Quality Agent runs.
- Then the Risk & News Agent enriches the picture.
- Finally, the Research Summary Agent reads the entire state and writes the report.
Right now, the pipeline runs in a clean, linear sequence, but this structure naturally evolves into a graph-based orchestration using LangGraph when you want conditional routing, parallel agents, or more advanced decision logic.
Each agent reads from and writes to a common state object. That shared state will be the backbone of our architecture and the key to clean routing.
Next, we'll define that shared state and the routing logic in Python.
Implementing Shared State and Routing Logic in Python
Now that we know what each agent does, we need a backbone that connects them. That backbone is a shared state object and a simple routing strategy that decides which agent to call next.
For this article, we start with a simple fixed sequence of agents. This keeps the workflow easy to understand and helps you focus on the core idea of agent collaboration before introducing more advanced routing.
Later, you can replace this with conditional routing, parallel branches, or a full LangGraph workflow. But as a starting point, a fixed sequence is the cleanest way to get the system working end-to-end.
You can think of the state as a single Python dictionary (or dataclass) that travels through the graph. Each agent reads from it, adds new information, and returns the updated version.
1. Defining the Shared State
Create a state.py file to keep things clean:

This structure keeps everything in one place. Each agent will update only the sections it owns.
2. Agent Interfaces
We'll keep each agent as a simple class with a run(state) method. This makes it easy to plug into LangGraph or any other orchestration later.
Example base pattern:

Each concrete agent (profile, fundamentals, etc.) will implement run() and return the updated state.
3. Simple Routing Strategy
For this article, we don't need an overly complex router. We can define a fixed sequence of agents and run them in order:
This gives you a clear, deterministic flow that's easy to understand and debug. Later, you can convert this into a graph with conditional branches if you want more dynamic logic (for example, skipping risk analysis for illiquid tickers).
4. Hooking In an LLM Client
Only the SummaryAgent (and optionally a “reasoning” agent) needs direct access to an LLM. You can centralize the client in a small helper, e.g. llm_client.py:
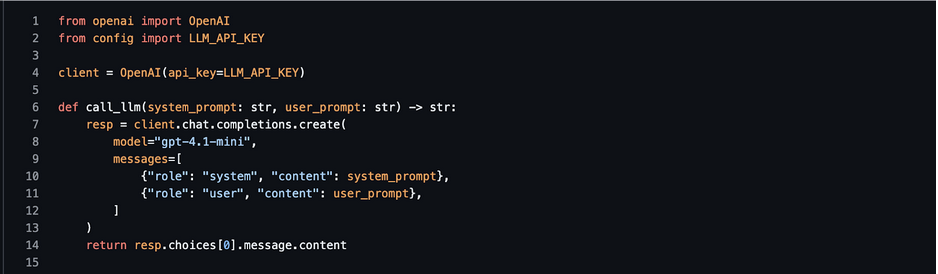
Agents that need the LLM can import call_llm instead of each managing their own client.
Coding the Multi-Agent Stock Research Assistant (Step-by-Step in Python)
Now we turn the design into code. We'll wire each agent to FMP MCP using the call_mcp_tool() helper and update the shared ResearchState.
We'll keep the code readable and modular so you can drop it into your own project.
1. MCP Client (Recap)
If you haven't already, this is our thin wrapper around the FMP's MCP server.
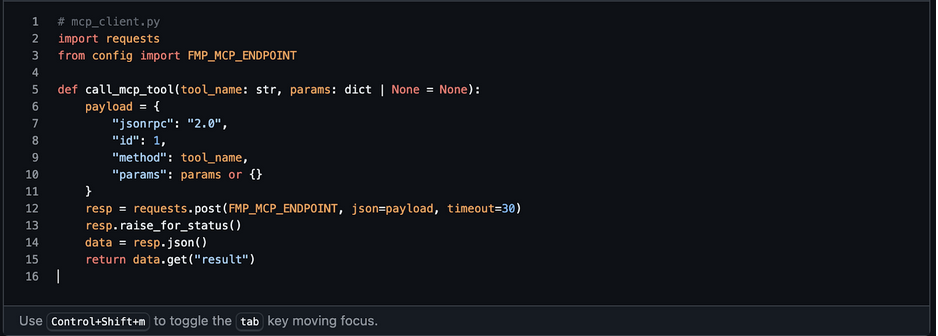
We'll reuse this in all agents.
2. Ticker & Profile Agent
This agent validates the symbol and fetches the company profile.
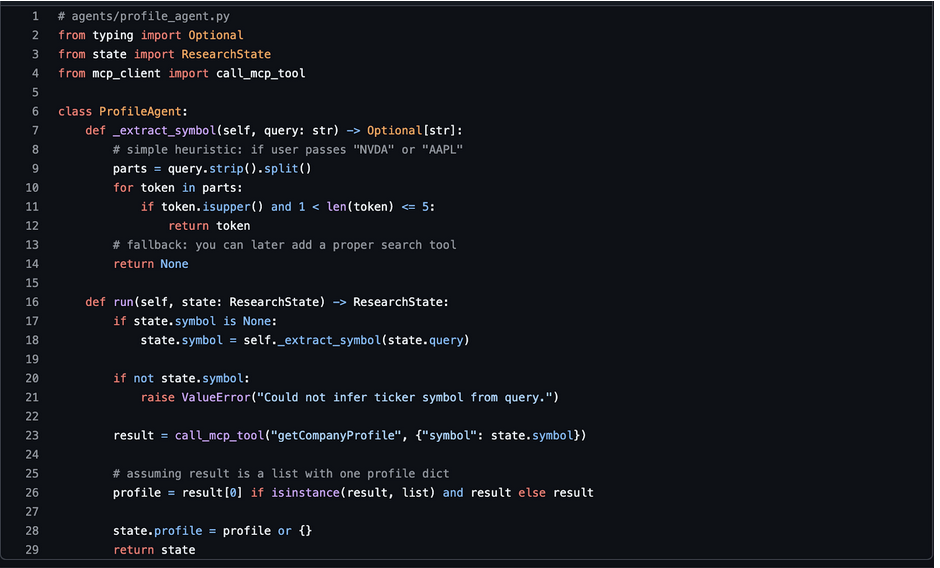
At this point, state.profile includes name, sector, industry, market cap, and more.
3. Fundamentals Agent
This agent fetches income statement, balance sheet, and cash flow.
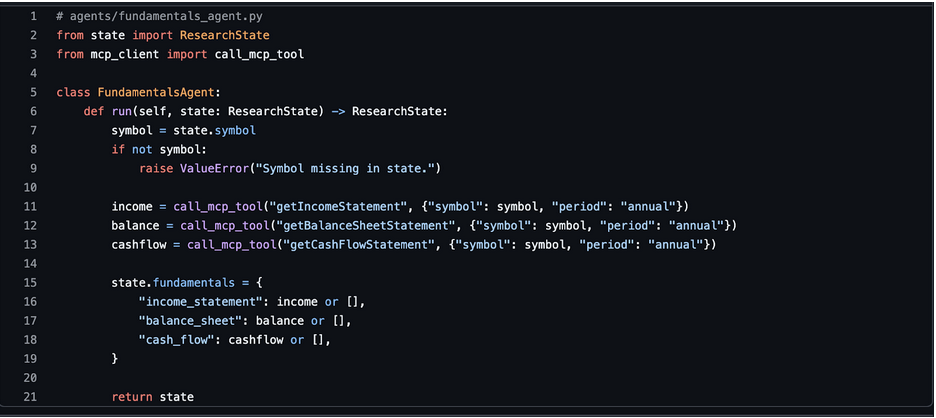
You can later slice to last 3-5 periods or compute growth directly here.
4. Ratios & Quality Agent
This agent fetches ratios and extracts a few useful highlights.
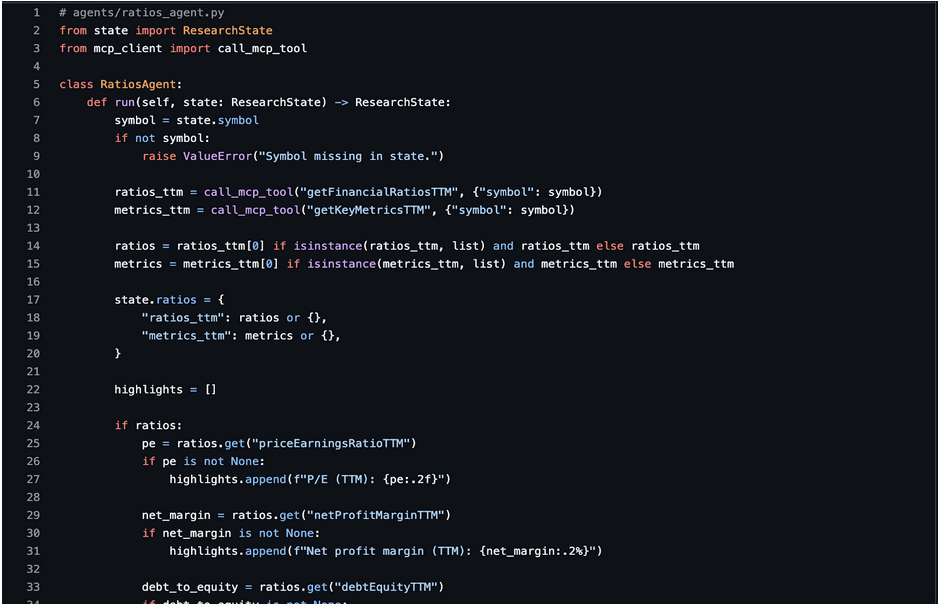
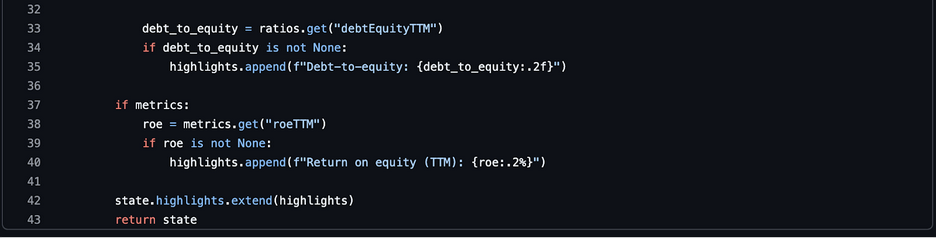
We keep the highlights short and numeric. The summary agent will turn these into language.
5. Risk & News Agent
This agent adds volatility and sentiment context.
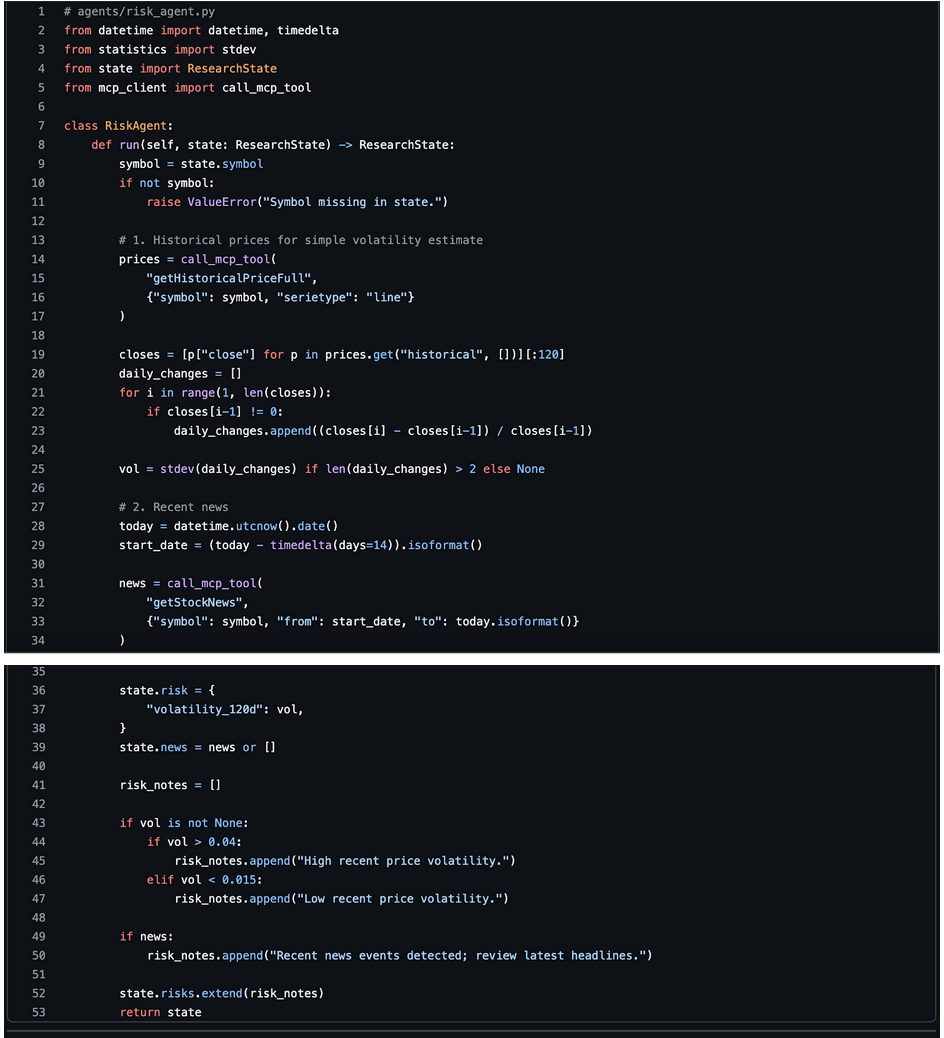
This is a simple risk view but good enough for a first version.
6. Research Summary Agent (LLM-Powered)
This agent reads the whole ResearchState and produces a human-friendly research note.
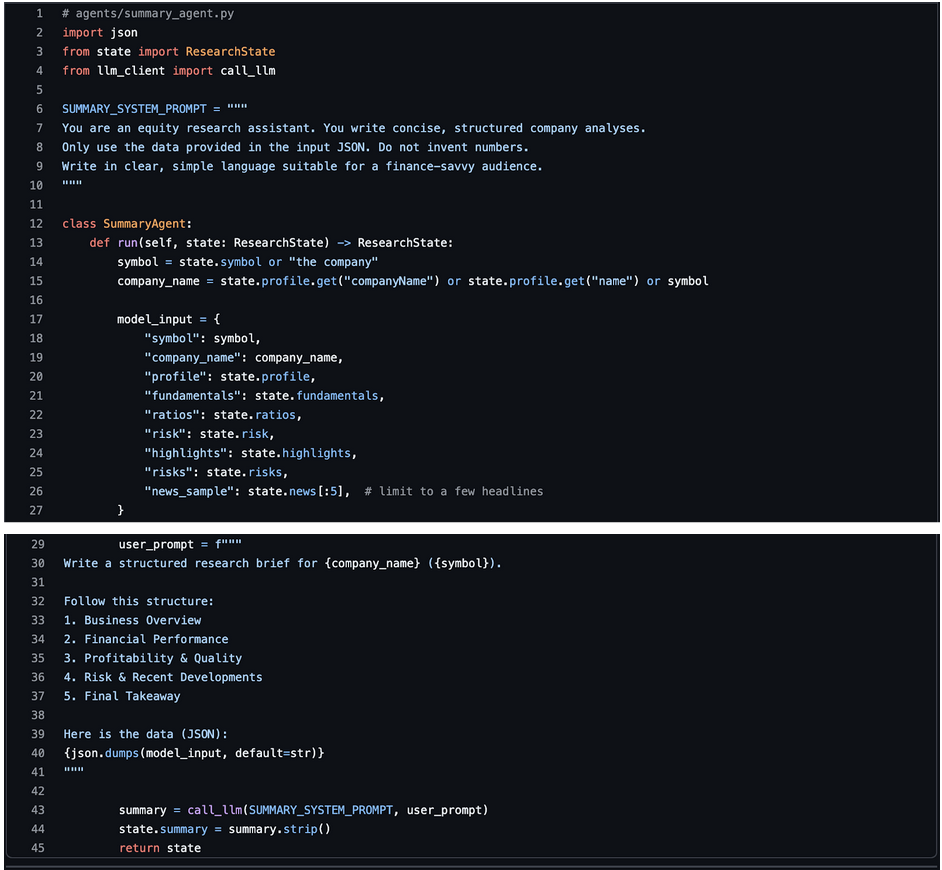
This is where your writing style comes alive. You can adjust the structure and tone easily via the prompt.
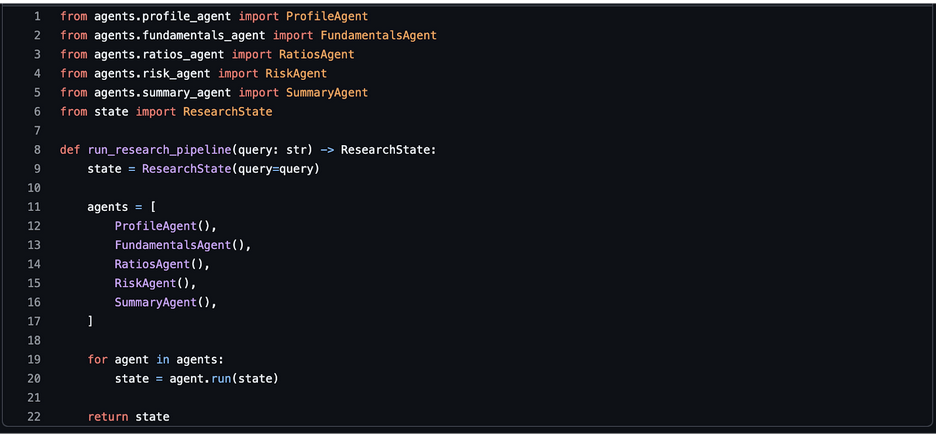
7. Wiring Everything in main.py
Finally, let's connect the pipeline and run a full example.
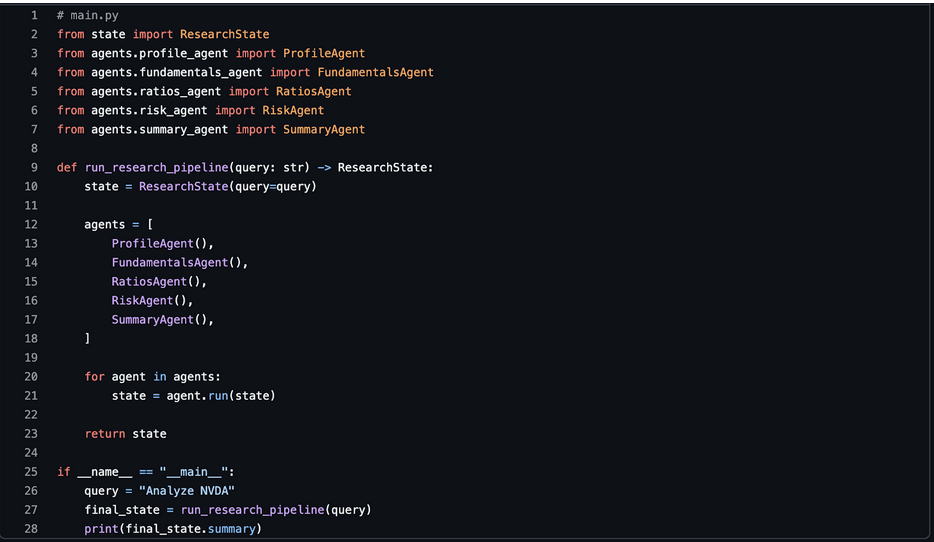
Run:
|
python main.py |
You should see a complete research brief generated from real FMP data, stitched together by your multi-agent system.
Possible Extensions: From Single Stock to Full Portfolio Analyst
Once your multi-agent assistant analyzes a single company, extending it to portfolio-level insights becomes natural. You already have modular agents, a shared state, and a reliable data pipeline powered by FMP MCP. You simply run the same reasoning loop across multiple tickers and combine the results.
You can introduce a Portfolio Agent that iterates through symbols, triggers the existing agents for each company, and aggregates the outcomes. It can calculate sector exposure, revenue concentration, volatility distribution, and financial quality across the entire basket. You can also add a Correlation Agent that uses historical price data to measure how each stock moves relative to the others. This helps highlight clusters and hidden risks inside the portfolio.
Another extension is adding weights and computing a risk-adjusted view. With FMP's historical prices, you can estimate portfolio volatility, contribution to variance, and drawdown sensitivity. You can also pull ETF holdings from FMP to compare your positions against major benchmarks.
Because your agents are modular, these enhancements require minimal changes. You simply introduce new nodes in the graph and reuse the logic you've already built. This is where the agentic architecture truly shines: every new insight becomes another agent, not another giant script.
Final words
A multi-agent system turns stock research into a structured, automated workflow. With FMP's MCP Server providing clean, reliable financial data and Python handling the orchestration, you can build an intelligent research assistant that works like a team of analysts. Each agent focuses on one task—profiles, fundamentals, ratios, risks, or summaries—and the shared state keeps everything organized and transparent.
This approach scales from a single ticker to portfolios, ETF overlays, and more advanced risk modeling. The examples in this guide give you a starting blueprint for an agentic research engine on top of FMP's data ecosystem that you can adapt to your own environment.

WACC vs ROIC: Evaluating Capital Efficiency and Value Creation
Introduction In corporate finance, assessing how effectively a company utilizes its capital is crucial. Two key metri...

BofA Sees AI Capex Boom in 2025, Backs Nvidia and Broadcom
Bank of America analysts reiterated a bullish outlook on data center and artificial intelligence capital expenditures fo...

Pinduoduo Inc. (PDD) Q1 2025 Earnings Report Analysis
Pinduoduo Inc., listed on the NASDAQ as PDD, is a prominent e-commerce platform in China, also operating internationally...